Advanced Google Analytics - Tips and Tricks
The author's views are entirely their own (excluding the unlikely event of hypnosis) and may not always reflect the views of Moz.
Google Analytics affects everyone in search engine marketing (unless you use another analytics package!) but not everyone knows how to take full advantage of it. To take full advantage of it we have to share knowledge and that's what I'm here to do. I'll be sharing some great advanced segments, how to do multiple goal conversion tracking and the secret success behind cross domain tracking.
1. Advanced Segments
Advanced segments provide you with the ability to take your reporting up a gear. So many people mention it, but how and what should I be doing? Asking that question in a mirror won't provide any answers but here's something that will....
Social media segment
If you are paying for social media traffic then it's imperative that you check the value it yields to sales i.e. does it even generate any direct sales? Here's how to find out:
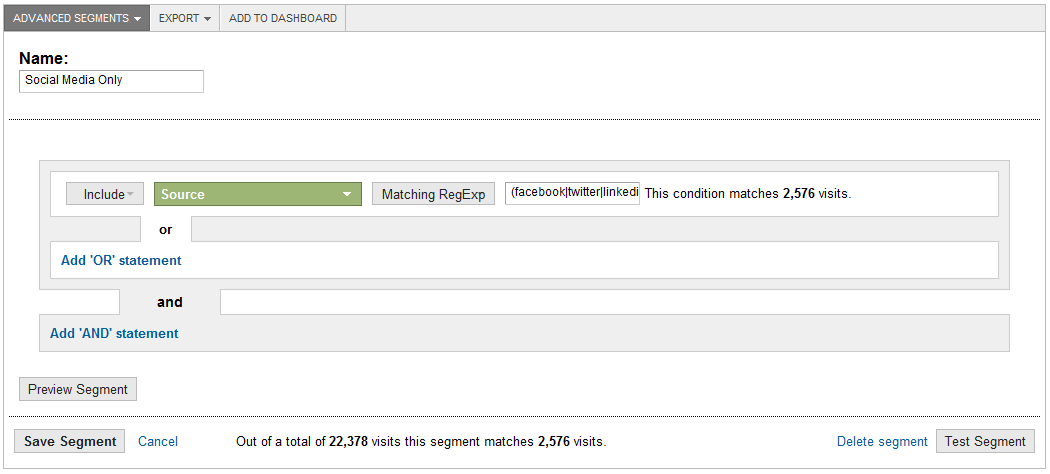
Click on the My Site tab > Advanced Segments > Then click on +New Custom Segment > Choose a name for it > Then click on +Add a dimension or metric > then add "Source" as a dimension > have it as "include" and "matching regular expression" then using a bit of regex, type the following in the field.
(facebook|twitter|linkedin|stumbleupon|youtube|vimeo|myspace|delicious|reddit|tumblr)

Click on test segment (check that it works!). Obviously find out the most relevant ones to your site and build up an accurate social media segment. Apply this to your reports and you can now segment your social media channel. Try cross tabbing by goal conversions to find out which channel is bringing in the beans.
Long tail keywords segment
Another useful advanced segment is to understand the long tail demand. Follow the same methodology to get into the advanced segment dashboard but follow this:
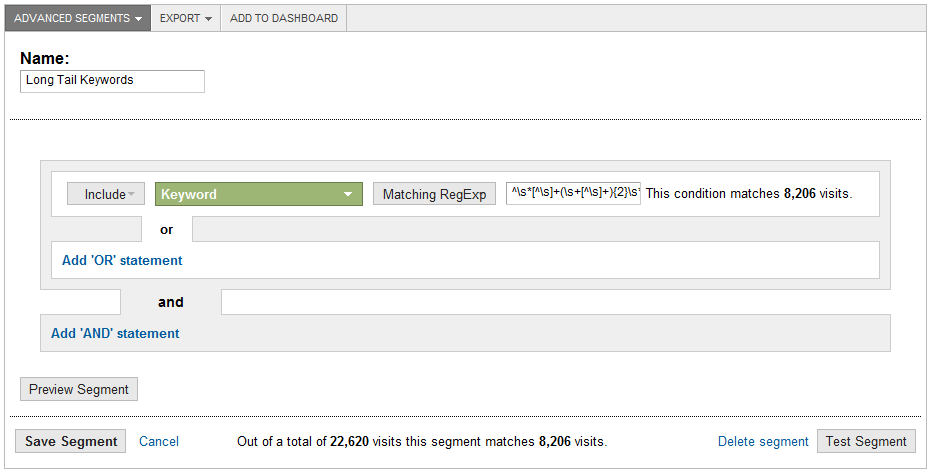
Click on +Add a dimension or metric > then add "Keyword" as a dimension > have it as "include" and "matching regular expression" then type the following in the field.
^\s*[^\s]+(\s+[^\s]+){2}\s*$

Applying this segment to your reports will show you keywords with greater than two words. To filter more or less keywords simply change the number, for example if I wanted searches with greater than four keywords then I would modify it as follows:
^\s*[^\s]+(\s+[^\s]+){3}\s*$
When applied to your reports it will show you keywords with greater than three words.
Non Branded keywords segment
This is useful if you want to understand search without any branded terms. Follow the same methodology to get into the advanced segment dashboard but follow this:
For this to make sense, imagine my company is called John Lewis.
Click on +Add a dimension or metric > then add "Keyword" as a dimension > have it as "exclude" and "matching regular expression" then type the following regex in the field.
(John|Lewis|Jon|Luis|Lews|…….)
Exclude these terms and the misspellings of the brand terms. Applying this segment will allow you to differentiate between non branded keywords. I wonder how relevant this will be to SEOs with the introduction of SSL Search by Google?
2. Multiple Goal Conversion Tracking
Goal tracking is simple, name your goal, add your goal URL i.e. /thank-you, setup a funnel etc. That's all great but let's say we have two paths to get people to register on our site as follows:
Path 1 - www.fabian.com/my_work = they registered from my home page and landed on my dashboard page.
Path 2 - www.fabian.com/download = they registered in order to access my free carpet samples.
Both destinations lead to a registration, so how do you create a goal with multiple URLs? Here's what to do:
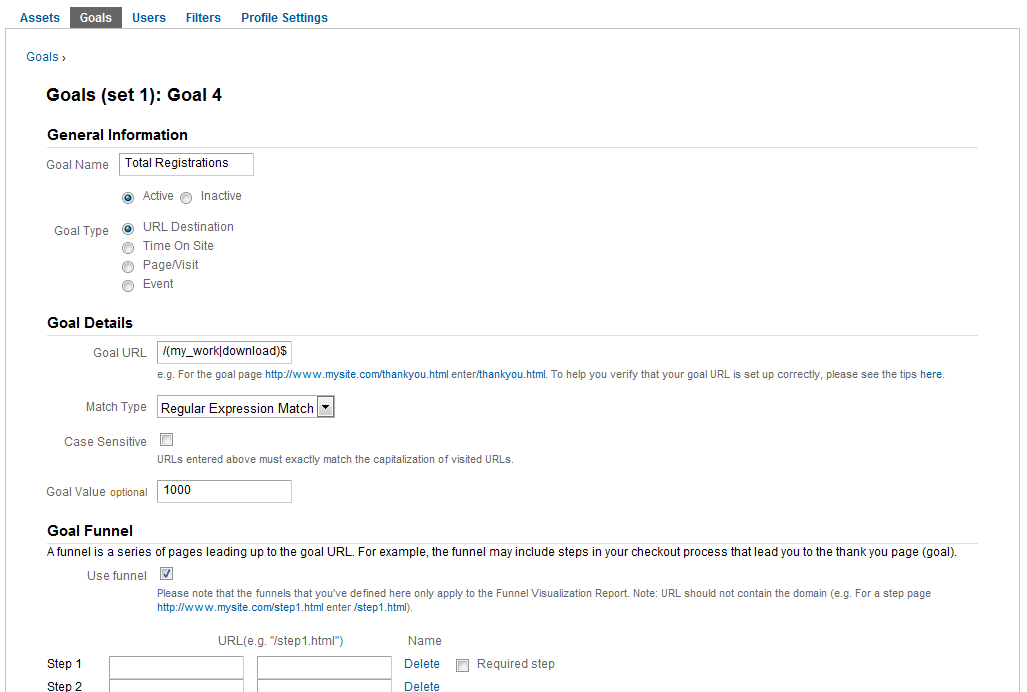
Get to the goal dashboard > name your goal > select goal type as "URL Destination"> then enter some regex into the Goal URL as shown below > on the "Match Type" field, select Regular Expression Match and save it.
/(my_work|download)$

You can remove the dollar ($) symbol at the end of it, if you want to capture dynamic elements.
To see a breakdown of the goal and to check that it is recording the correct pages, use the Goal Verification Report or Goal URLs (new analytics). I've tested this and it works 100%.
3. Cross Domain Tracking
The GA tracking cookies are first party cookies, which mean they can be used only by the website that sets them. If a visitor decided to leave the site to a different domain, the tracking cookies won't work. For example if your site accepts third party payments on another site then you will need use cross domain tracking to preserve the referral.
For cross domain tracking to work you need to have the Google Analytics Tracking Code (GATC) on both domains and the third party site must not prohibit query string parameters.
Step 1 – Modify the GATC
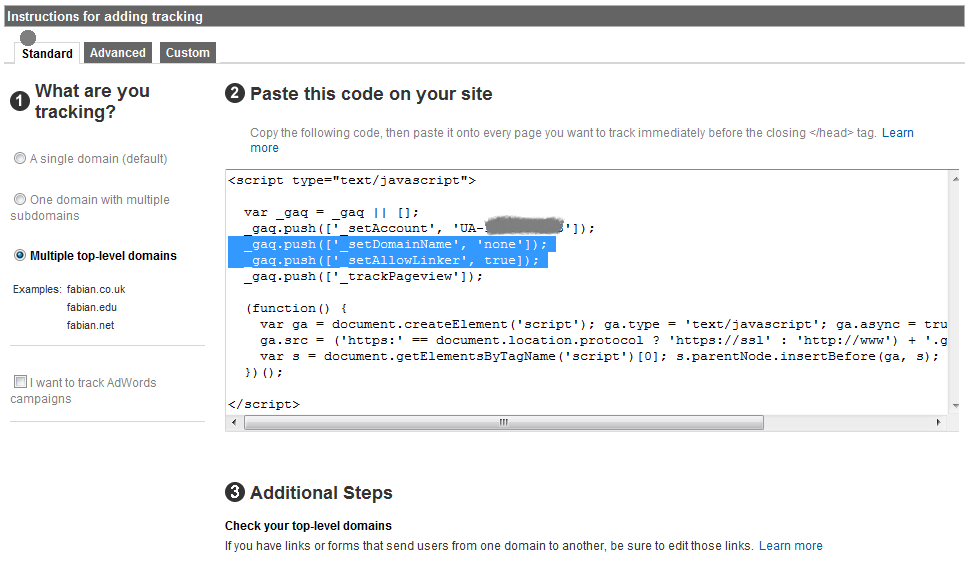
Go to Analytics Settings > Tracking Code > Select "Multiple top-level domains" radio button > Google Analytics will provide you with two new lines of code as shown below.

_gaq.push(['_setDomainName', 'none']);
_gaq.push(['_setAllowLinker', true]);
It's possible to get a cookie with a domain of www.seogadget.co.uk and .seogadget.co.uk which would mean getting more than one set of cookies per visitor. According to Justin Cutroni, it's usually best practice to use the primary domain of your website instead of the 'none'. For example I would use '.seogadget.co.uk' to avoid multiple instances of the Google Analytics tracking cookies.
Step 2 – Transferring the cookies
Analytics has two methods to transfer the tracking cookies between the two domains which are _link() and _linkByPost()
Both extract the cookie values from the cookies and place the data in the destination page URL as query string parameters. Imagine our primary domain is www.seogadget.co.uk and our 3rd party payment site is www.moneyforfabian.com then apply the following:
Example 1 = If your website transfers the visitor between domains using standard anchor tags, use _link()
<a href="http://www.moneyforfabian.com" onclick=
"_gaq.push(['_link', 'http://www.seogadget.com']);return false; ">Buy Now</a>']);
Example 2 = If your website uses a form to transfer visitors between domains then you need to use _linkbypost()
<form name="post_form" action="http://www.moneyforfabian.com" method="post"
onsubmit="_gaq.push(['_linkbypost', this]);">
Once you've applied either _link() or _linkByPost(), your site visitors will be tracked across the two domains.
Final thoughts
Everything discussed has been tested and works like a charm. If you come across any problems implementing these techniques drop me a line on twitter @panduuf or drop a comment below.
As always I'd love to hear your thoughts, thanks for reading it and I hope it's useful.


Comments
Please keep your comments TAGFEE by following the community etiquette
Comments are closed. Got a burning question? Head to our Q&A section to start a new conversation.